In this article, you will find information about:
- Spread costs over multiple periods.
- Spreading an invoice can be done via:
- Spreading invoices for Twinfield.
- Spreading invoices for Exact online.
- Spreading invoices for AFAS.
- Spreading invoice for Wunderbricks
- Period Settings for invoices on Header & Line Level
- Limitations.
1.Spread costs over multiple periods.
This allows you to spread deferred costs, down payments, or installments over multiple periods. In Smartbooqing, we call this “spreading.”
You can spread (split) the amount in two ways:
- Total amount (excluding VAT)
- Invoice line amount (excluding VAT)
2.Spreading an invoice can be done via:
Spread settings can be applied from the following pages-
- The Review Page.
- The Invoice detail page.
3.Spreading invoices for Twinfield
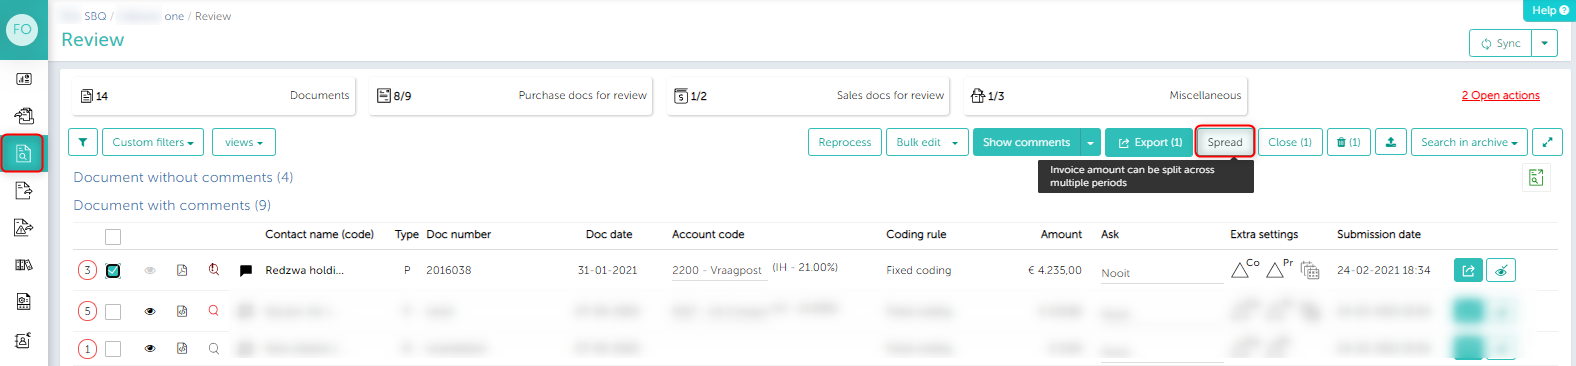
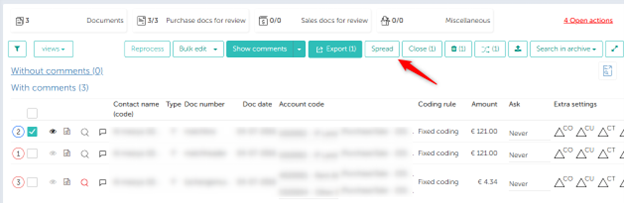
3.1 – Review page
Review Page-> Select document -> “Spread” button.
1. Select one invoice of type purchase or sales.
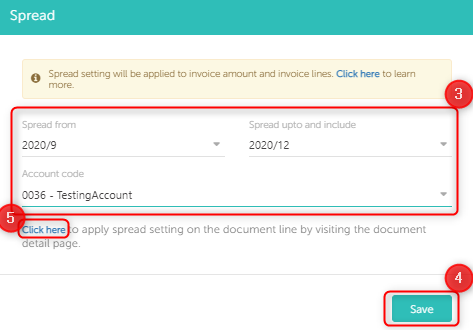
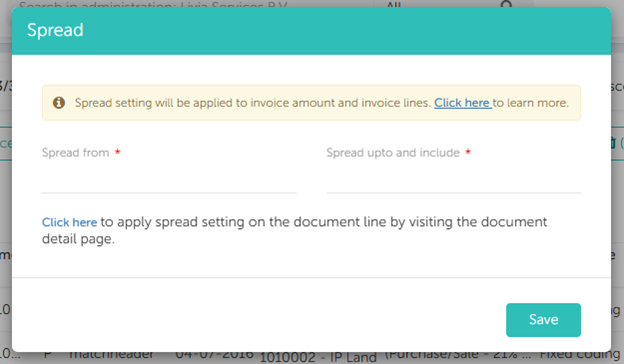
2. Click on ‘spread’ to be able to adjust the settings.

3. Set the start and end period and the general ledger account.
4. Click “Save” to spread the amount (excluding VAT). The set spread period will also be applied to all document lines.
5. You can also set the spread settings for the individual invoice lines via the document detail page.

6. An invoice with spread settings is indicated with an icon (see below).

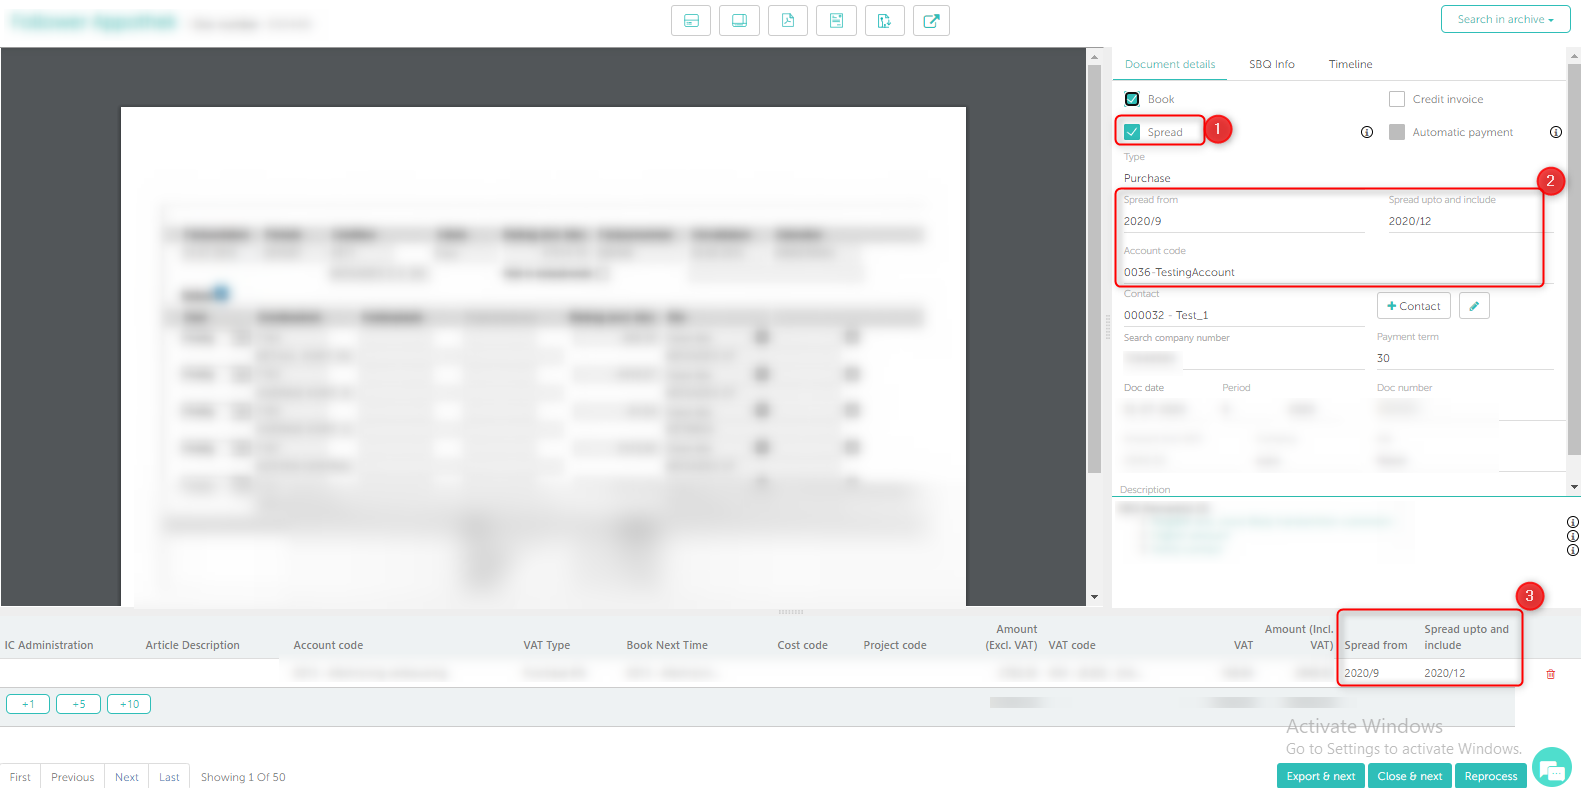
3.2 Document details page
You can apply spreading to the invoice amount and also to individual invoice lines.
1. Activate the spreading settings by checking the box.
2. Set the start and end periods and the general ledger account for the invoice amount. This will also be applied to all invoice lines.
3. You can also set the payment period for individual invoice lines. The invoice period is considered the payment period for the invoice amount.
Note: You cannot delete the settings of a specific invoice line.
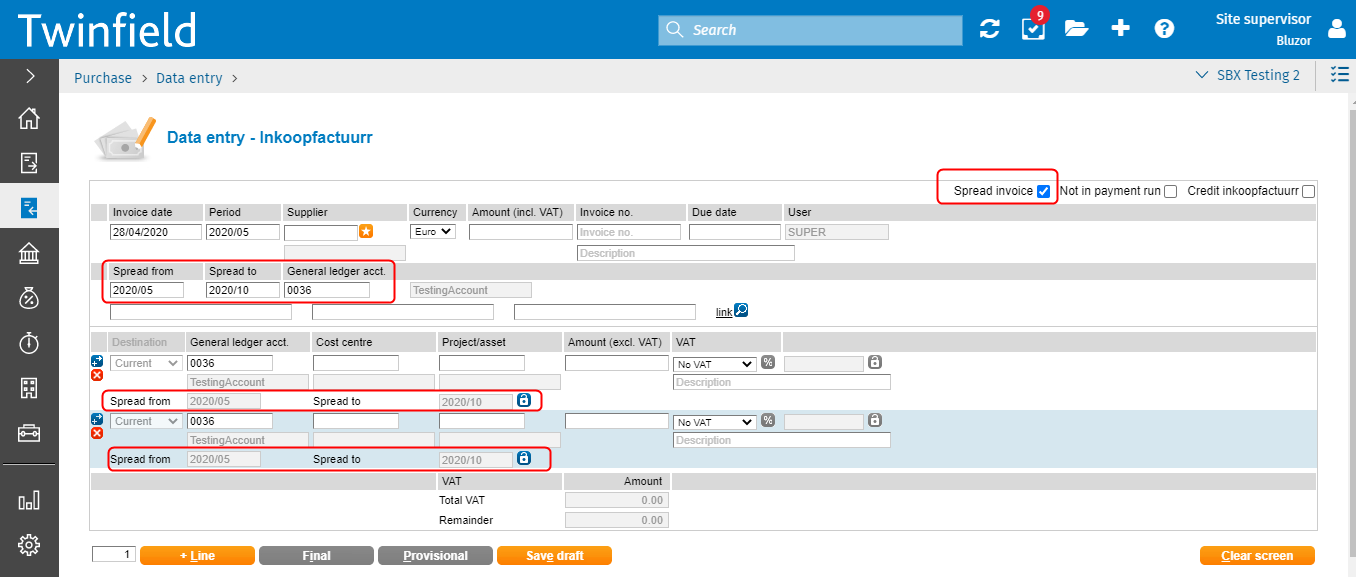
3.3 Settings in Twinfield
While booking,
- Go to → menu ‘Purchase’ → Input → Enter all invoice data → click on ‘spread invoice’ (top right) → Select the period from-to → select general ledger account for staggered booking → click on ‘save draft’
- You can also search for the invoice exported from.
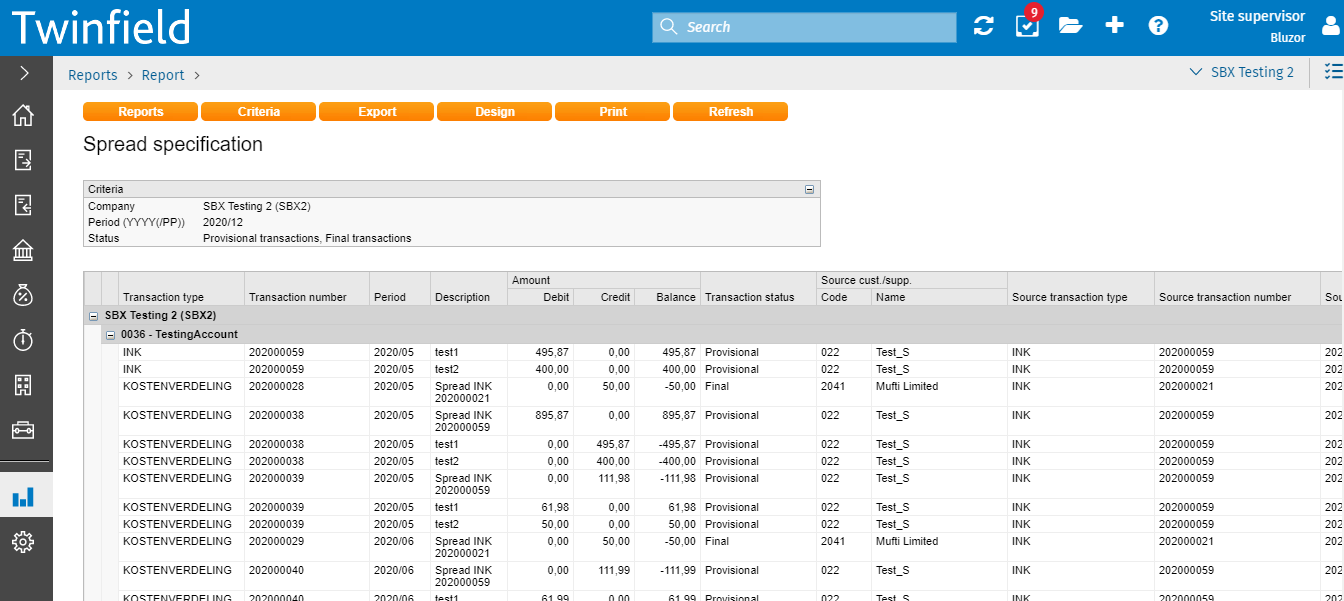
- In the search field at the top of Twinfield → Type ‘Overview of spread bookings’ (shortcut to see data)

- Enter the period (the last period) → Click on ‘Draft bookings’ → click on ‘Next’.

- You can see the entry there but not the splits.

- Split amounts are visible after the booking has been finalized. Go to ‘Financial Professionals’ → ‘Bookings’ → ‘Draft Bookings’ → select creditors → Edit booking → click ‘Final’.
![]()
- The split bookings are now visible.
- If there are closed period(s), this will only result in a restriction during booking.
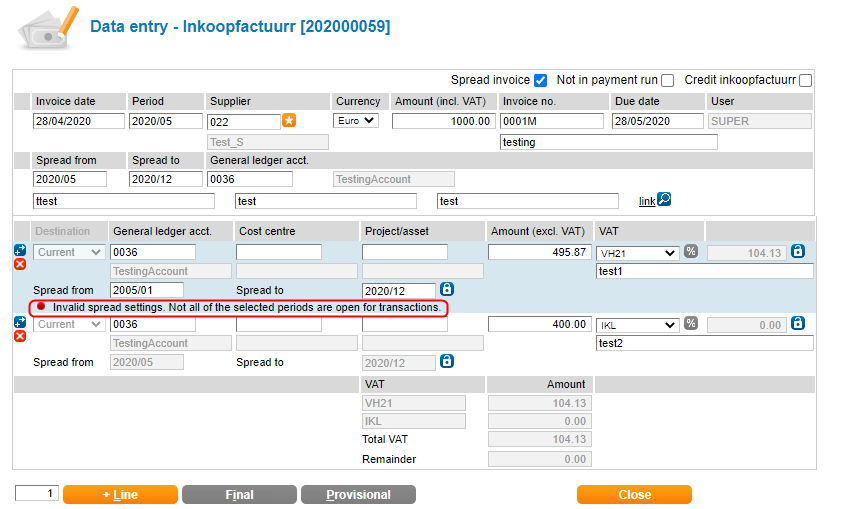
Limits
- A balance code is used when spreading, but you can also select a profit/loss general ledger account when spreading/splitting.
4. Spreading invoices for Exact online
4.1 Review page
Review Page–> Document–> ‘Spread’ Button
- Select one invoice (sales or purchase).
- Click on ‘spread’ to be able to adjust the settings.
- Set the start and end period and the general ledger account.
- Click “Save” to spread the amount (excluding VAT). The set spread period will also be applied to all document lines.
- You can also set the spread settings for the individual invoice lines via the document detail page.
6. An invoice with spread settings is indicated with an icon (see below).
4.2 Document details page
You can apply spreading to the invoice amount and also to individual invoice lines.
- Activate the spreading settings by checking the box.
- Set the start and end periods and the general ledger account for the invoice amount. This will also apply to all invoice lines.
- You can also set different payment periods for individual invoice lines.
- You can remove the spreading period for individual invoice line(s).

4.3 Settings in Exact Online
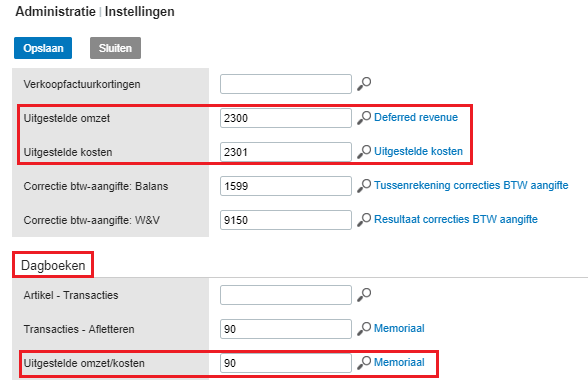
Setting
- Go to → Select the administration at the top left Click on ‘Settings’ → assign a general ledger account to ‘Deferred costs’ and ‘Deferred revenue’ Select the journal for ‘Deferred revenue/costs’ and click on ‘Save’.
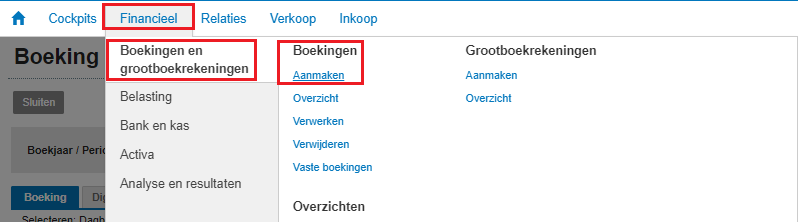
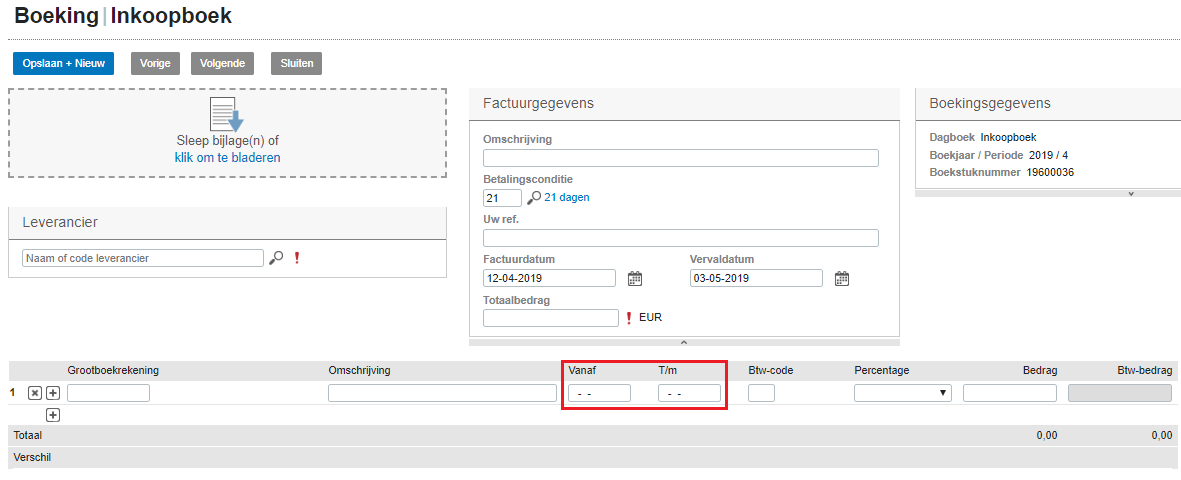
While booking
- Go to → Financial → Bookings and general ledger accounts Create Bookings Select the purchase ledger.

- The deferred expense fields are usually not visible on the screen where a new booking can be made. Adjust the following:
- Click the settings icon in the top right corner → click “Edit.” Under “Rules,” find “Deferred charges” and turn it ON. Then click “Save.”


- The ‘from/to’ fields are now visible.
- After posting the invoice, the split deferred costs can be seen in journal 90 (selected above)
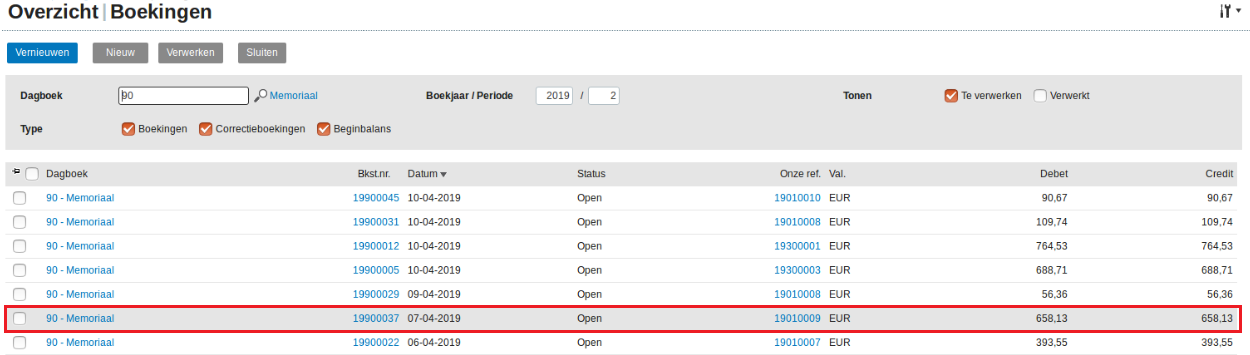
- View this in → Financial → Bookings and general ledger accounts Bookings Overview Click on the line of journal 90.
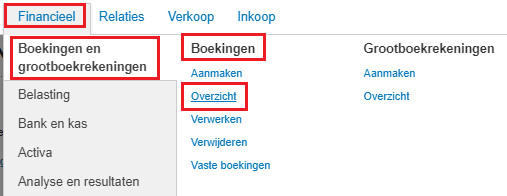
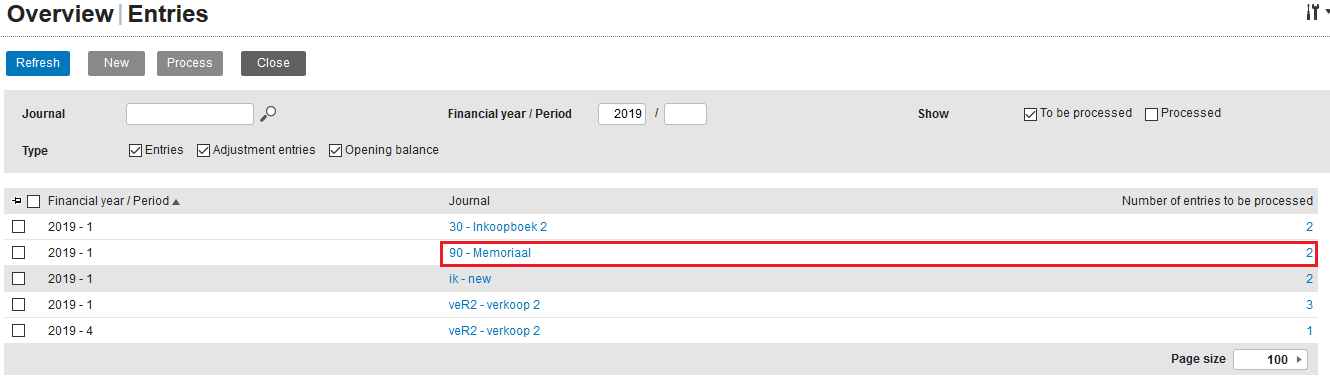
- Click on the line you want to see and you will see how it is split.

- If it needs to be split into equal amounts for each period, set the following-
- Go to → Select the organization at the top left Select ‘Settings’ Financial Split bank/cash bookings and choose ‘Automatically split invoice payments per invoice’ Click on ‘Save’.
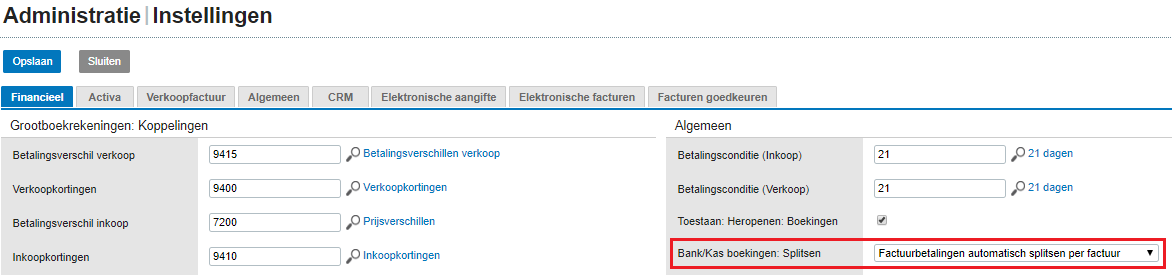
- The next booking can be split.
- Old bookings can be edited and saved together with the periods.

Limitation
- When booking, the split invoice lines are not visible.
- Invoice grouping settings will be disabled if the invoice is spread out.
5.Spreading invoices for AFAS
5.1 Review page
Review Page–> Document–> ‘Spread’ Button
- Select one invoice (sales or purchase).
- Click on ‘spread’ to be able to adjust the settings.
- Set the start and end period and the general ledger account.
- Click “Save” to spread the amount (excluding VAT). The set spread period will also be applied to all document lines.
- You can also set the spread settings for the individual invoice lines via the document detail page.
- An invoice with spread settings is indicated with an icon (see below)
5.2 Document details page
You can apply spreading to the invoice amount and also to individual invoice lines.
- Activate the spreading settings by checking the box.
- Set the start and end periods and the general ledger account for the invoice amount. This will also apply to all invoice lines.
- You can also set different payment periods for individual invoice lines.
- You can even remove a spread period for a specific invoice line by clicking on that specific line and removing the date entirely.
5.3 Setting in AFAS
Go to Financials –> Management –> Administration settings
(You can also search for “Administrative Settings”)
Then -> Other books –> Select the correct journal under Transitory item.
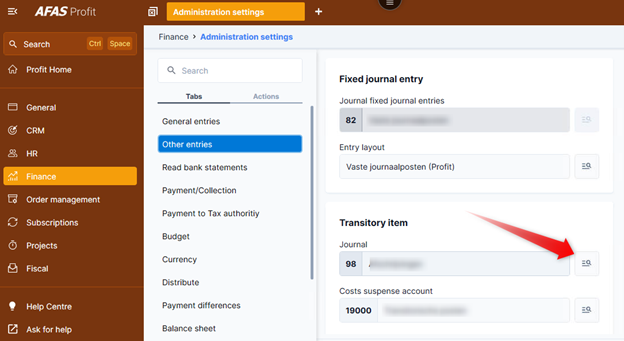
This setting is mandatory to prevent invoices from getting stuck on the export error page.
6. Spreading the invoice for Wunderbricks.
6.1 From the Review Page
Navigation: Review Page → Select Document → Spread Button
-
Select a single invoice of type Purchase or Sales.
-
Click the Spread button to open the spread settings.
-
Set the spread period by choosing the start and end dates.
-
Click Save to apply the spread to the invoice. This spread period will also apply to all invoice lines.
-
To set spread settings for individual invoice lines, visit the Invoice Detail page.
-
Once applied, a spread icon will appear next to the invoice on the Review page.

6.2 From the Invoice Detail page
You can also apply spread settings directly to individual invoice lines on the Invoice Detail page.
-
Enable spread settings by checking the Spread checkbox.
-
Set the spread period for the invoice amount. This setting will apply to all invoice lines by default.
-
Alternatively, you can customize the spread period for each invoice line individually.
7. Period Settings on Invoice – Header & Line Level
Period Booking allows SmartBooqing to automatically calculate the correct accounting period for an invoice (or for specific article lines) based on predefined rules.
These rules can:
- Shift the invoice period
- Spread the invoice over multiple periods
- Combine shift + spread settings
- Apply custom spread rules (week/month/quarter/year)
You can add the settings in two ways:
- Header Level (settings is applied on the entire invoice)
- Line level (only added to specific line based on keyword)
7.1 Header Level Settings
General settings -> Period Booking -> Add new
1.Select the contact from Contact name drop-down.
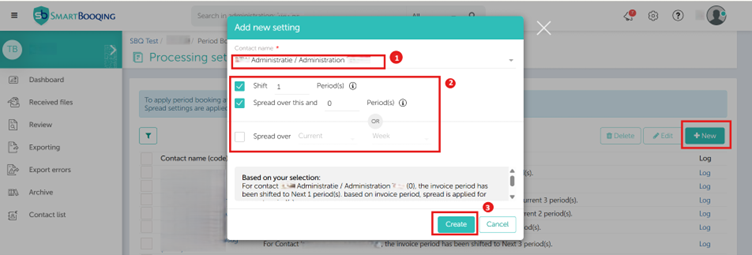
2. Select the period settings option.
- If Shift setting is selected, add period number (financial period)
- If Spread over setting is selected, add period number (financial period)
- If Shift & Spread over is selected, then add period number for both options (financial period)
- If Spread custom setting is selected , select the duration and time from the drop-down.
3.Click on Create. A new setting will be created.
General settings -> Period Booking -> Edit rule
- Select the settings and click on edit, change the period settings accordingly.

- Click on Update and existing settings will be updated.
7.2 Line Level Settings
General settings ->Specific code ->Add new profile
-
- Add profile name.
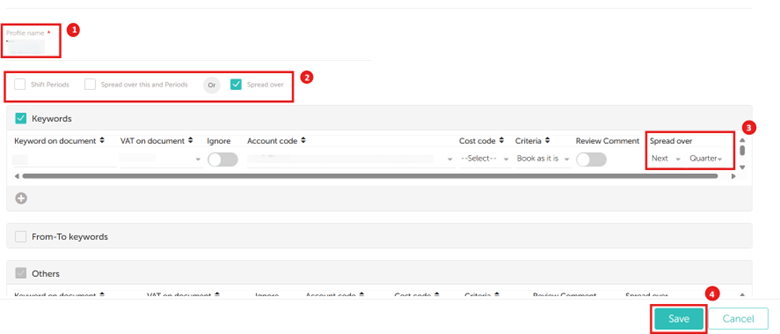
- Select the period setting options.
- Add the period details in the settings.
- If Shift setting is selected, add period number (financial period)
- If Spread over setting is selected, add period number (financial period)
- If Shift & Spread over is selected, then add period number for both options (financial period)
- If Spread custom setting is selected, select the duration and time from the drop-down..
- Click on Save and a new profile will be created.
- Once Specific coding profile is added to the contact then line level period settings will be applied to the invoices.
General settings ->Specific code ->Edit profile- Click on the profile which needs to be edited. Add /Edit the period settings option for the profile.
- Add the period details of the settings.
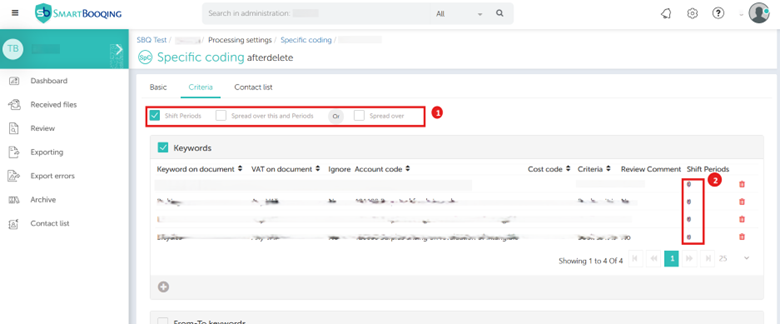
- Profile will be auto updated.
- Add profile name.
Limitations
-
- If the staggering settings are enabled on invoice lines, the group posting feature will no longer work. The only exception is Wunderbricks, where all invoice lines are still grouped, but under the staggering period of the first invoice line.
- On the Review page, distribution settings can only be applied to one invoice at a time. It’s not possible to select multiple invoices and apply distribution settings in bulk.
- Distribution settings also cannot be applied to other or non-bookable invoices.
- The distribution function is currently available for the following accounting packages: Twinfield, AFAS, Wunderbricks and Exact Online.
- Specifically for Twinfield, once a distribution setting has been applied to an invoice line, it can no longer be removed.
- For Wunderbricks, staggering settings are mandatory. If the staggering checkbox is not selected or staggering periods are not defined, the system automatically uses the invoice’s document date to determine both the start and end periods.