- Enabling 2FA
- How does it work?
- Disabling 2FA
- 2FA as an Organization Setting
Enabling 2FA
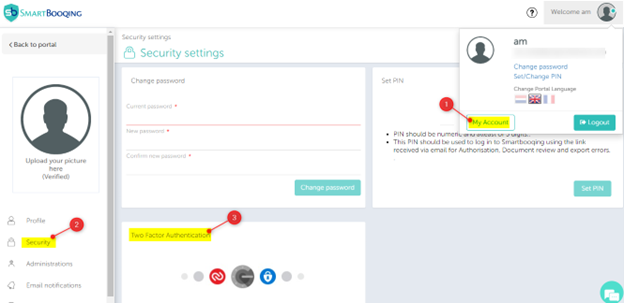
To set the 2FA for a user profile, the user will have to log in using their credentials and then navigate to the “My Account” page. Under “Security”, they will find the option of the 2FA feature, as shown below,
Once there, the 2FA menu to either Enable or Disable the functionality will be seen. If it is the first time, the 2FA is being set up then only the Enable menu will be shown. Once the “Enable” button is clicked, another window will pop up and you can follow the steps as following:
- Download the application: Users will have to download an Authenticator app of their choice from the links provided on this page. (Microsoft/Google Authenticator app is recommended).If a user already has an app installed, they can simply click on the “Next” button.
- Scanning the QR Code: The user must then scan the QR shown, from their authenticator app. If the user is unable to scan the QR on the app then the user needs to manually type in the code displayed in the grey area. This code must be kept safe as it may be required in case of account recovery. This code is unique for every user and must be cautiously stored.A user must check the “I have noted down code” box to enable the Next button.
- Verify Code: To check if the authenticator app has been correctly configured, the user must enter their login password (for Smartbooqing) and the code which is being displayed in the authenticator app. Once done, click on “Register”.Note: The authenticator app code which is being generated changes every 30 seconds.
How does it work?
Once the 2FA has been enabled, i.e., the code has been verified (from Step 3), the user will be logged out of Smartbooqing and they will have to log in again using their Email, Password, and the 2FA code from the configured mobile.
Disabling 2FA
The user goes to the same menu as they did for Enabling 2FA which is:
“My Account” –> “Security” –> Two Factor Authentication
The user clicks on “Disable.” They will have to enter their Smartbooqing login password and the latest authenticator code and click on “Disable”.
If the feature has been correctly disabled, then the user will be logged out of Smartbooqing and can log in as usual afterward.
2FA as an Organization Setting
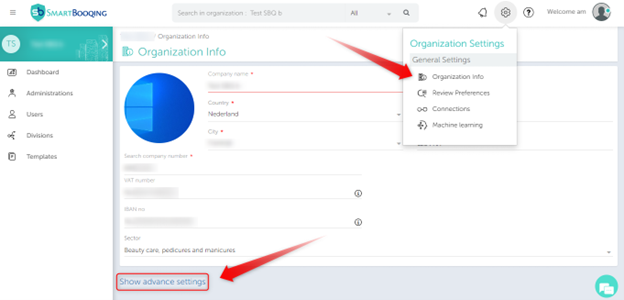
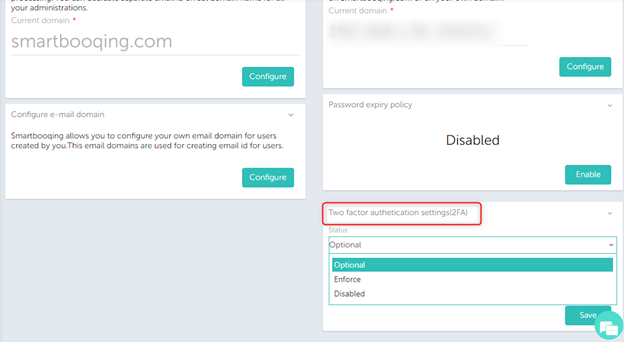
Administrators of an Organization can choose if they want the 2FA feature to be applied across all their users. This option would be available under “Organization info” as shown below,
Admins would have the options of:
- Optional
- Enforce
- Disabled
Optional:
For optional, the 2FA setting would only apply to users who themselves have activated this setting. They can change this setting via our “My Account” page, under “Security”, as shown in the image below.
Enforce:
If the 2FA setting is Enforced at the organization level, then users will have to mandatorily set up the 2FA on their phones to continue using the portal. Users will not have an option to “Disable” the setting in any which way.
Note: If a user already had 2FA configured for their account, and the Organization setting is changed to Enforce, they will have to set up their 2FA with the authenticator app again. Meaning – Earlier configured settings will be lost in case of enforce.
Disable:
If the 2FA setting is disabled, the users can continue using the portal without having configured their authenticator apps. However, in this case, users will not be able to “Enable” the option.
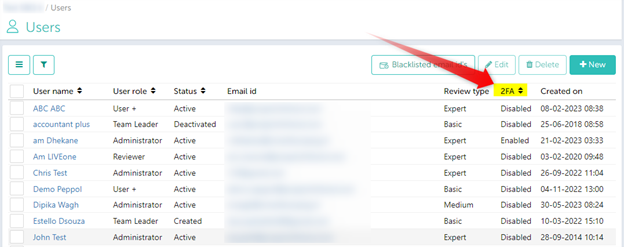
Addition of the “2FA” field to the Users page:
Here, users will be able to see the status of the 2FA for other users.


